posts in
blogging tips

So many of you have reached out to me asking how I edit my instagram photos so today's post is dedicated to showing you all my favorite apps and editing tips. It's nothing complicated at all, honestly, I could probably just use VSCO and be completely fine. The way I edit depends on the photo but for the most part, I try to stick to the same filters so that my feed flows and feels cohesive.
My must have editing apps are VSCO and Lightroom. Facetune and Snapseed are really good too but I don't use them every time.

Step 1: Import photo into the Lightroom app. From here I will first edit the lighting, vibrance, saturation, colors, etc. This app is really perfect for pulling little details, like bringing up the saturation in your dress, enhancing your skin tone, etc. Another fun tool I like using in this app is split toning, which lets you pick the hue of your highlights and shadows. I tend to go for pinks/oranges/purples. Lastly, I will save the photo.

Step 2: I open up the photo in VSCO. This is the fun part and what gives my photos their overall feel! My top 3 filters are E7, E5, and M5. E5 gives my photos a pink tint that I love and is my most used filter. E7 is similar to that one but makes my skin pop more! And M5 is like a soft, muted filter which I love to layer with and is great for flat lays. One thing I have found when I can't decide which filter to use is to layer them up! This way I can get what I love from both without settling for only one. You just have to apply your first filter, save it, upload it, then apply your next filter. Next, I give my photo it's finishing touches. I will crop it to fit Instagram, add grain and increase sharpness.

\
Occasionally I will need to whiten/desaturate objects or backgrounds and that's when I would use Snapseed and Facetune. I also really love the details feature on Facetune, it's perfect for making jewelry/accessories pop.
Occasionally I will need to whiten/desaturate objects or backgrounds and that's when I would use Snapseed and Facetune. I also really love the details feature on Facetune, it's perfect for making jewelry/accessories pop.
From here I will upload it to my LIKEtoKNOW.it and link up all the products I'm wearing for you guys to shop. Be sure to follow me on the app to be the first to see my looks!
That's it! I told you guys it was pretty simple. Now it's your turn! Let me know if there's any photo editing app that I need to try or let me know your favorite filters!
xx
How I Edit My Instagram Photos
9.27.2018
Happy Tuesday friends! Today I'm sharing three things I always do to every single one of my blog images to help improve SEO. SEO is short for search engine optimization and this can directly affect your ranking in search engines. You want to make sure you stay on top of your SEO game so that your blog stays visible to search engines and people are able to find your content organically. There are so many ways to improve your SEO but for today I'll be focusing on three simple things you can do to give your posts a search boost. Let's get started!
Keywords
SEO is all about KEYWORDS! Not only should you be using them in your posts but it's super important to use them when naming your photos. Since search engines can't actually see your photos, they rely on keywords to know what's going on in the photo. A photo named 'IMG_2017_08' doesn't tell google anything about what's going on in the photo, therefore, it's not going to perform well in search results. When I rename my outfit photos I like including the brands I'm wearing, or which season the outfit would be appropriate for. If I'm doing a review on a beauty product, I make sure to include the word 'review' along with the name of the product.

ALT Text
This stands for alternative text. You should use this space to write a description of what's going on in your image. Like I said before, search engines can't actually see your photos so they rely on this description to help users find the most relevant information. I like using the same keywords I used to name my photos to fill this in.
Image Size
My last tip is to always resize your images. Huge image files will make your blog load a lot slower and loading time can have a big impact on your SEO. The quicker your website loads the better it will rank in search results. I find that keeping your image width anywhere from 600-1000 pixels works really well.

See you guys tomorrow with another outfit post!
Thanks for reading! xo

Hello loves! Today I'm sharing with you all how to create your very own product collage! When I first started making product/wishlist collages I had no idea what I was doing. They were very time consuming (and still are) but I loved creating them!! I taught myself how to make them by just googling specific things (like how to transform images) but I always wished I could find a post that told me EXACTLY how to make them. So keep reading if you want to learn how to create a product collage!
Before we get started, let's quickly talk about these items that are currently on my wishlist! These are all versatile pieces and can be worn now or in the upcoming months. Everyone needs a little leopard print in their life and these leo pumps are gorgeous (This pair is similar and on sale for under $100!). They have great reviews and the brand that makes them is known for their comfort! Wear them along with this red hot moto jacket and you've got yourself a killer outfit! Also, I've been wanting to try a pair of AG jeans and these are calling my name, did I mention that they're on sale too?! Lastly, crossbody bags have been everywhere lately! I found this little cutie in a neutral color (and under $50!) to carry only the essentials - like this Fresh rose lip balm (so creamy and so good!) and a pair of sunnies. My birthday will be here soon so I may have to treat myself to one or two of these haha :)
Back to the tutorial! First off, I edit all my photos and create my collages using Photoshop CC. It's a monthly subscription so it makes it very affordable! It can be overwhelming at first but with a little practice, it becomes so easy to use! I highly recommend it!
One: Gather your images.
Pick a theme for your collage and start saving your images onto your computer. I like to save them all to a folder in my computer called blog collages. This allows me to keep everything organized. Tip: If the website doesn't allow you to right click and save the image then just take a screenshot!

Two: Create a new file.
Once you open Photoshop click on the new file button. Here you'll pick the dimensions for your new blank file where all of your images will go. There's also the option to change the color of your background but it's best to keep it white.
Three: Open saved images.
Go to file > open > (or hit ctrl + o) then hold down your ctrl key and select all your images. Doing this will open up all your files at once and will save you time!
One: Gather your images.
Pick a theme for your collage and start saving your images onto your computer. I like to save them all to a folder in my computer called blog collages. This allows me to keep everything organized. Tip: If the website doesn't allow you to right click and save the image then just take a screenshot!

Two: Create a new file.
Once you open Photoshop click on the new file button. Here you'll pick the dimensions for your new blank file where all of your images will go. There's also the option to change the color of your background but it's best to keep it white.
Three: Open saved images.
Go to file > open > (or hit ctrl + o) then hold down your ctrl key and select all your images. Doing this will open up all your files at once and will save you time!

Four: Paste your images onto your blank canvas.
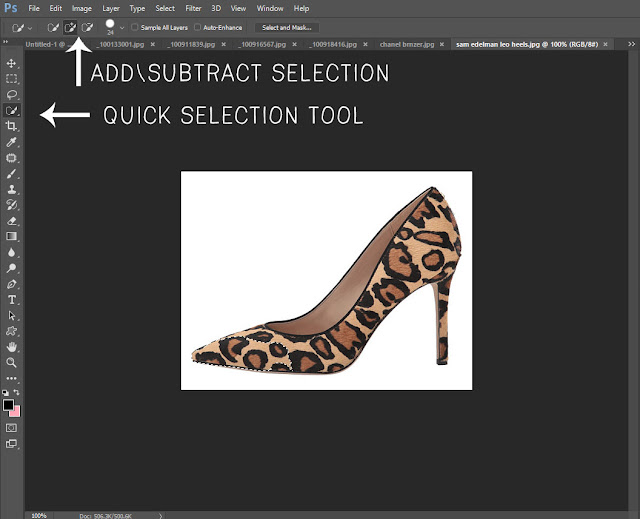
This is where the real fun begins! Now it's time to get all of your products onto your white background. There are many ways to do this part but I like using the quick selection tool because it allows me to be precise. You can change the size of this tool at the top and beside of that you'll also find a brush with a +\- sign. This allows you to add to your selection or subtract from it. Now that you've selected the product you want to hit ctrl + c. This will copy your selection. Then select your blank document from your list at the top and use ctrl + v to paste it on there.

Five: Stay organized.
You'll want to stay organized by naming each new layer (You create a new layer each time you paste.), especially when creating a collage with lots of products! On your right-hand side, you want to double click where it says layer 1 and rename it. This way, when you want to move around your leopard pumps you know exactly which layer to click on first.
Six: Transform and rearrange.
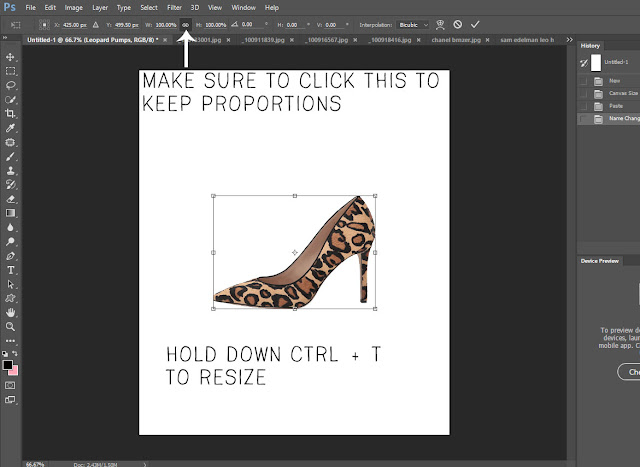
Use the transformation tool by holding down ctrl + t. This allows you to resize your image - but before you do that click on the maintain aspect ratio button at the very top. This keeps your image proportioned correctly. Hit enter once your done resizing! Then you can move your product around to where you want it. I wouldn't worry too much about this until you have all your products on your canvas. Until then simply repeat steps four through six.

Seven: Add text or numbers.
This step is completely optional but you can go in and number your products or give your collage a title. All you have to do is hit the type tool on the left side and click the area where you want the text. From here you'll pick your favorite font and size and hit enter once you're done. I've included some of my favorite free fonts down below! Just click on the link and it'll take you to the download page.

Arcane | Bakery | Raleway | Savu | Sortdecai | Sweet Pea

Eight: Save your collage!
By now you've added so many layers to your document and you're going to want to merge them! Once you're happy with how it all looks just right click on the background layer and hit merge visible. This also turns your file from a PSD to a JPEG but just double check it's a JPEG before saving! Now hit ctrl + s to save your file and name it!
This is where the real fun begins! Now it's time to get all of your products onto your white background. There are many ways to do this part but I like using the quick selection tool because it allows me to be precise. You can change the size of this tool at the top and beside of that you'll also find a brush with a +\- sign. This allows you to add to your selection or subtract from it. Now that you've selected the product you want to hit ctrl + c. This will copy your selection. Then select your blank document from your list at the top and use ctrl + v to paste it on there.

Five: Stay organized.
You'll want to stay organized by naming each new layer (You create a new layer each time you paste.), especially when creating a collage with lots of products! On your right-hand side, you want to double click where it says layer 1 and rename it. This way, when you want to move around your leopard pumps you know exactly which layer to click on first.

Six: Transform and rearrange.
Use the transformation tool by holding down ctrl + t. This allows you to resize your image - but before you do that click on the maintain aspect ratio button at the very top. This keeps your image proportioned correctly. Hit enter once your done resizing! Then you can move your product around to where you want it. I wouldn't worry too much about this until you have all your products on your canvas. Until then simply repeat steps four through six.

Seven: Add text or numbers.
This step is completely optional but you can go in and number your products or give your collage a title. All you have to do is hit the type tool on the left side and click the area where you want the text. From here you'll pick your favorite font and size and hit enter once you're done. I've included some of my favorite free fonts down below! Just click on the link and it'll take you to the download page.
Arcane | Bakery | Raleway | Savu | Sortdecai | Sweet Pea

Eight: Save your collage!
By now you've added so many layers to your document and you're going to want to merge them! Once you're happy with how it all looks just right click on the background layer and hit merge visible. This also turns your file from a PSD to a JPEG but just double check it's a JPEG before saving! Now hit ctrl + s to save your file and name it!
Et voila! That's how I make my product collages! It definitely gets easier once you start making them pretty regularly! Let me know if you guys found this helpful or if you have any questions!
Subscribe to:
Posts (Atom)


Social Icons