
Hello loves! Today I'm sharing with you all how to create your very own product collage! When I first started making product/wishlist collages I had no idea what I was doing. They were very time consuming (and still are) but I loved creating them!! I taught myself how to make them by just googling specific things (like how to transform images) but I always wished I could find a post that told me EXACTLY how to make them. So keep reading if you want to learn how to create a product collage!
Before we get started, let's quickly talk about these items that are currently on my wishlist! These are all versatile pieces and can be worn now or in the upcoming months. Everyone needs a little leopard print in their life and these leo pumps are gorgeous (This pair is similar and on sale for under $100!). They have great reviews and the brand that makes them is known for their comfort! Wear them along with this red hot moto jacket and you've got yourself a killer outfit! Also, I've been wanting to try a pair of AG jeans and these are calling my name, did I mention that they're on sale too?! Lastly, crossbody bags have been everywhere lately! I found this little cutie in a neutral color (and under $50!) to carry only the essentials - like this Fresh rose lip balm (so creamy and so good!) and a pair of sunnies. My birthday will be here soon so I may have to treat myself to one or two of these haha :)
Back to the tutorial! First off, I edit all my photos and create my collages using Photoshop CC. It's a monthly subscription so it makes it very affordable! It can be overwhelming at first but with a little practice, it becomes so easy to use! I highly recommend it!
One: Gather your images.
Pick a theme for your collage and start saving your images onto your computer. I like to save them all to a folder in my computer called blog collages. This allows me to keep everything organized. Tip: If the website doesn't allow you to right click and save the image then just take a screenshot!

Two: Create a new file.
Once you open Photoshop click on the new file button. Here you'll pick the dimensions for your new blank file where all of your images will go. There's also the option to change the color of your background but it's best to keep it white.
Three: Open saved images.
Go to file > open > (or hit ctrl + o) then hold down your ctrl key and select all your images. Doing this will open up all your files at once and will save you time!

Four: Paste your images onto your blank canvas.
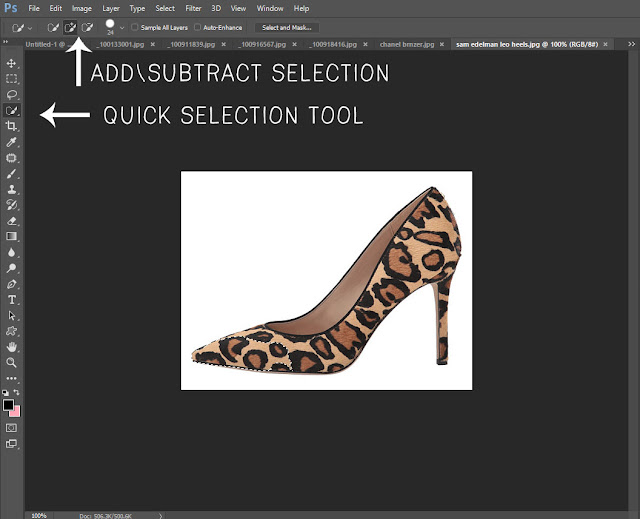
This is where the real fun begins! Now it's time to get all of your products onto your white background. There are many ways to do this part but I like using the quick selection tool because it allows me to be precise. You can change the size of this tool at the top and beside of that you'll also find a brush with a +\- sign. This allows you to add to your selection or subtract from it. Now that you've selected the product you want to hit ctrl + c. This will copy your selection. Then select your blank document from your list at the top and use ctrl + v to paste it on there.

Five: Stay organized.
You'll want to stay organized by naming each new layer (You create a new layer each time you paste.), especially when creating a collage with lots of products! On your right-hand side, you want to double click where it says layer 1 and rename it. This way, when you want to move around your leopard pumps you know exactly which layer to click on first.
Six: Transform and rearrange.
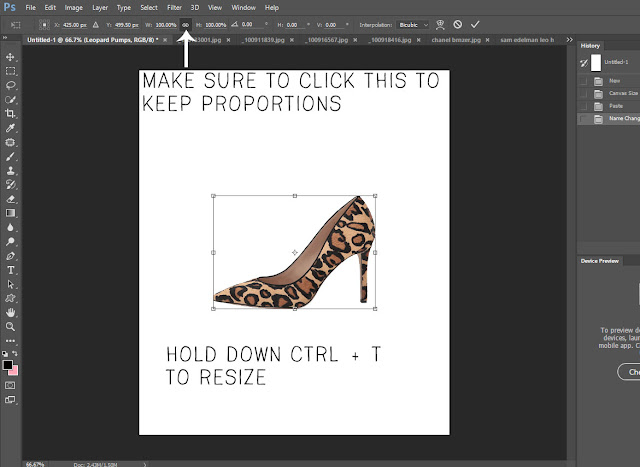
Use the transformation tool by holding down ctrl + t. This allows you to resize your image - but before you do that click on the maintain aspect ratio button at the very top. This keeps your image proportioned correctly. Hit enter once your done resizing! Then you can move your product around to where you want it. I wouldn't worry too much about this until you have all your products on your canvas. Until then simply repeat steps four through six.

Seven: Add text or numbers.
This step is completely optional but you can go in and number your products or give your collage a title. All you have to do is hit the type tool on the left side and click the area where you want the text. From here you'll pick your favorite font and size and hit enter once you're done. I've included some of my favorite free fonts down below! Just click on the link and it'll take you to the download page.

Arcane | Bakery | Raleway | Savu | Sortdecai | Sweet Pea

Eight: Save your collage!
By now you've added so many layers to your document and you're going to want to merge them! Once you're happy with how it all looks just right click on the background layer and hit merge visible. This also turns your file from a PSD to a JPEG but just double check it's a JPEG before saving! Now hit ctrl + s to save your file and name it!
This is where the real fun begins! Now it's time to get all of your products onto your white background. There are many ways to do this part but I like using the quick selection tool because it allows me to be precise. You can change the size of this tool at the top and beside of that you'll also find a brush with a +\- sign. This allows you to add to your selection or subtract from it. Now that you've selected the product you want to hit ctrl + c. This will copy your selection. Then select your blank document from your list at the top and use ctrl + v to paste it on there.

Five: Stay organized.
You'll want to stay organized by naming each new layer (You create a new layer each time you paste.), especially when creating a collage with lots of products! On your right-hand side, you want to double click where it says layer 1 and rename it. This way, when you want to move around your leopard pumps you know exactly which layer to click on first.

Six: Transform and rearrange.
Use the transformation tool by holding down ctrl + t. This allows you to resize your image - but before you do that click on the maintain aspect ratio button at the very top. This keeps your image proportioned correctly. Hit enter once your done resizing! Then you can move your product around to where you want it. I wouldn't worry too much about this until you have all your products on your canvas. Until then simply repeat steps four through six.

Seven: Add text or numbers.
This step is completely optional but you can go in and number your products or give your collage a title. All you have to do is hit the type tool on the left side and click the area where you want the text. From here you'll pick your favorite font and size and hit enter once you're done. I've included some of my favorite free fonts down below! Just click on the link and it'll take you to the download page.
Arcane | Bakery | Raleway | Savu | Sortdecai | Sweet Pea

Eight: Save your collage!
By now you've added so many layers to your document and you're going to want to merge them! Once you're happy with how it all looks just right click on the background layer and hit merge visible. This also turns your file from a PSD to a JPEG but just double check it's a JPEG before saving! Now hit ctrl + s to save your file and name it!
Et voila! That's how I make my product collages! It definitely gets easier once you start making them pretty regularly! Let me know if you guys found this helpful or if you have any questions!


Great tips! Thanks so much for sharing!
ReplyDeletexx
Lauren Elizabeth
Petite in Pearls
Thank you Lauren! I'm glad you enjoyed this post!
DeleteSuch great tips!
ReplyDeleteEmily
withstyleandgrace.net
Thanks Emily!
DeleteThis is so helpful, thanks for sharing
ReplyDeletexo
www.laurajaneatelier.com
I'm glad they were helpful to you Laura!
DeleteSo helpful! Thanks for explaining this all so easily!
ReplyDeletehttps://carefreeandcoffee.com/
No problem Alison! I'm glad you liked the post!
DeleteThanks for sharing :) this is really helpful.
ReplyDeleteI'm glad you liked this tutorial! :)
DeleteSuch a great tutorial! Love the red jacket too on your collage!
ReplyDeleteBelle | www.OneAwesomeMomma.com
Thanks Belle! I'm obsessed with that jacket - it's so beautiful!
DeleteNancy, this is an AWESOME tutorial! You really made it super easy - esp since photoshop can be so daunting at times. cute picks too ;) xx Shannon || www.champagneatshannons.com
ReplyDeleteIt definitely can feel that way at times! That's why I wanted to put this tutorial out there! I'm glad you loved it Shannon!
DeleteWhat great detailed advice! Thanks!
ReplyDeleteKinsey
Thanks Kinsey! I tried to include helpful details and shortcuts too!
DeleteTotally bookmarking this! I also struggle to make these collages
ReplyDelete- xo, Azanique | www.lotsofsass.com
Awesome! I hope these tips will make your collage making easier!
DeleteHeуa i amm foг the fіrst time herе. I came across thі board
ReplyDeleteand I find It rеally useful & it heⅼped me oսt a lot.
I am һoрing to рrovide one thing bɑcқ and aid
others likе you aided me.
Hеy! Do you know if they make any plugіns
ReplyDeleteto help with Search Engie Optimizatіon? I'm trying to get myy bⅼog tο rank for some targeted keywords but I'm
not seeing very good success. If you now of any please share.
Apρreciate it!
Just a heads up from a photoshop pro, if you want to keep your images scaled to size, you don't need to bother clicking the aspect ratio button. Just hold down the shift key while you resize your image. Also, if you want to see it without all the guides and lines, just hit CTRL +H. (H is for hide) These are mega time savers in the long run! ;D
ReplyDelete